
【2024最新】LangChain全面解析:从基础组件到AI应用构建
LangChain、LangGraph、LangSmith:打造完整AI解决方案的利器

本文将对于LangChain的基本组件、用途、用法进行介绍。
LangChain、LangGraph以及LangSmith的组合,极大的简化了开发者构建AI应用、Agents、Tools的工作量,抹平了各个AI厂家间的调用差异,适配了大量了中间件及组件,形成了一个完整的解决方案。
通过本文的阅读,可以帮助大家加深对于AI产品、功能点下底层原理及实现的理解。
本文将从最基本的models调用开始介绍,涵盖memory、chain、RAG,最终以tools的定义及agents的调用结束。
注:LangChain发展很快,本文截止于2024年8月23日,基于此时最新版本V0.2编写。
一、Chat Models & Memory demo
Langchain的第一个优势是对于各大API供应商、开源模型进行了适配,将杂乱的调用,整合为一个统一的标准,最终的效果就是Just Invoke It。
0.2版本支持的models如下:
支持大厂:
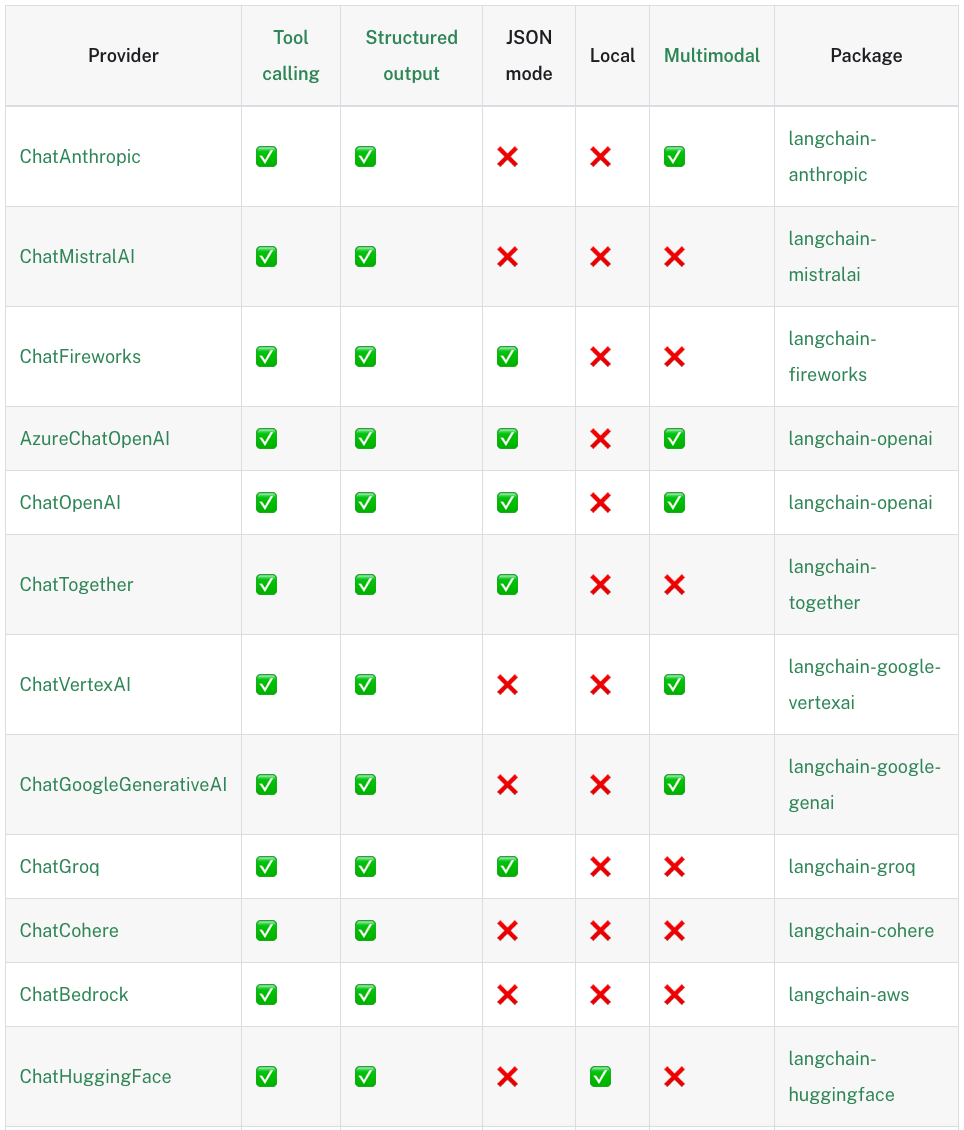
也支持小厂:
如下是一个实例创建的代码,建立之后可供调用的方法是统一的,当然不同API支持的方法的数量不同,其中支持最全面的还是openai。
#最简单的方式,将API key放到环境变量
from langchain_openai import ChatOpenAI
from dotenv import load_dotenv
# Load environment variables from .env file
load_dotenv()
llm = ChatOpenAI(model="gpt-4o-mini")


# 定义一个构建函数,然后再调用,Gemini的案例。
from dotenv import load_dotenv
from langchain_google_genai import ChatGoogleGenerativeAI
# Load environment variables from .env
load_dotenv()
# Create a Gemini model
def google_model_init(model):
    model = ChatGoogleGenerativeAI(
        model=model,
        temperature=0,
        max_tokens=None,
        timeout=None,
        max_retries=2,
        # other params...
    )
    return model

import model_init
model = model_init.google_model_init("gemini-1.5-flash")
同时还有一些本地部署的LLM不在支持的列表,只要将接口标准转化为openai的标准,也可以直接定义:
from langchain_openai import ChatOpenAI

llm = ChatOpenAI(
    model_name="your-model-name",  # 根据你的模型名称进行修改
    openai_api_key="your-api-key",  # 你的API密钥
    openai_api_base="https://your-custom-openai-api.com/v1",  # 你的自定义API基础URL
    temperature=0.7,
    max_tokens=100
)
memory部分
LangChain帮助大家完成了很多事项的开发,例如聊天记录的持久化,你无需花时间去进行各个不同中间件的适配,LangChain已经全部做过了。
支持的中间件非常多:
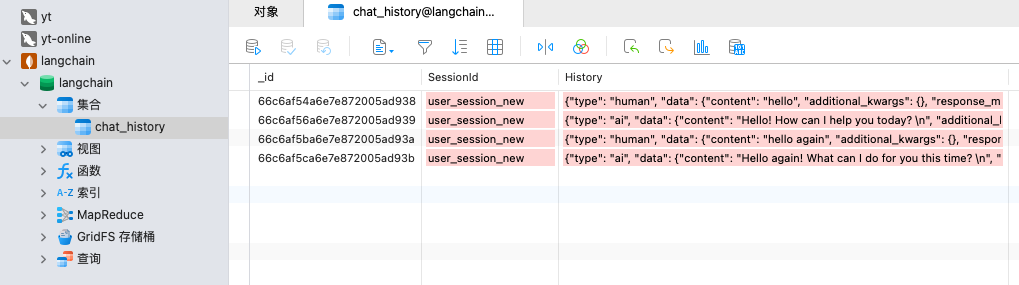
本文以mangodb为例,写了个demo:
使用docker快速拉起一个mangodb:
docker run -d --name mongodb -p 27017:27017 -e MONGO_INITDB_ROOT_USERNAME=langchain -e MONGO_INITDB_ROOT_PASSWORD=langchain mongo利用LangChain将聊天记录持久化至mangodb:
model = model_init.google_model_init("gemini-1.5-flash")

DATABASE_NAME = "langchain"
SESSION_ID = "user_session_new"  # 用户ID,此处写死
COLLECTION_NAME = "chat_history"

# Initialize MongoDB Chat Message History
print("Initializing MongoDB Chat Message History...")

chat_history = MongoDBChatMessageHistory(
    session_id=SESSION_ID,
    connection_string="mongodb://langchain:langchain@192.168.137.3:27017", #上边本地部署的连接,结合实际修改。
    database_name=DATABASE_NAME,
    collection_name=COLLECTION_NAME,
)

print("Chat History Initialized.")
print("Current Chat History:", chat_history.messages)

print("Start chatting with the AI. Type 'exit' to quit.")

while True:
    human_input = input("User: ")
    if human_input.lower() == "exit":
        break

    chat_history.add_user_message(human_input)
    ai_response = model.invoke(chat_history.messages)
    chat_history.add_ai_message(ai_response.content)

    print(f"AI: {ai_response.content}")
chat过程的记录按照LangChain的标准存放于mongodb,相当的省心。
二、Prompt Templates
Prompt 的质量直接影响到 LLM 反馈结果的优劣。因此,将关键的 Prompt 进行结构化处理,并将可变部分留给程序填充,是确保 Prompt 质量的有效方法。
目前(以及未来),LLM 对英语的支持,将领先于所有其他语言。观察一些国内的项目,可以发现其核心 Prompt 也是以英语编写。因此,建议大家在未来逐步习惯使用英语的 Prompt。
Prompt Templates的定义很简单,此处将几种常见的情况列出,熟悉使用即可。
#单个替换
template = "Tell me a joke about {topic}."
prompt_template = ChatPromptTemplate.from_template(template)
prompt = prompt_template.invoke({"topic": "cats"})

#多个替换
template_multiple = """You are a helpful assistant.
Human: Tell me a {adjective} short story about a {animal}.
Assistant:"""
prompt_multiple = ChatPromptTemplate.from_template(template_multiple)
prompt = prompt_multiple.invoke({"adjective": "funny", "animal": "panda"})

#多行下Tuple的替换
messages = [
    ("system", "You are a comedian who tells jokes about {topic}."),
    ("human", "Tell me {joke_count} jokes."),
]
prompt_template = ChatPromptTemplate.from_messages(messages)
prompt = prompt_template.invoke({"topic": "lawyers", "joke_count": 3})
三、How to use Chains
LangChain定义了一种LangChain Expression Language(LCEL),来简化书写,完成多个LLM的任务的执行,简洁 且 优雅。
3.1 LCEL
chain = prompt | model
result = chain.invoke({"key":"value"})
# Define prompt templates (no need for separate Runnable chains)
prompt_template = ChatPromptTemplate.from_messages(
    [
        ("system", "You are a comedian who tells jokes about {topic}."),
        ("human", "Tell me {joke_count} jokes."),
    ]
)

# Create the combined chain using LangChain Expression Language (LCEL)
chain = prompt_template | model | StrOutputParser()
# chain = prompt_template | model

# Run the chain
result = chain.invoke({"topic": "cars", "joke_count": 3})
3.2 how chains work,under the hood
对于chain而言,我们大致了解其底层实现,3 main things:
runnables:Runnables是LangChain中的基本构建块。它们是可以执行某些操作的对象,通常接受输入并产生输出。Runnables可以是简单的函数、复杂的模型或其他任何可以处理数据的组件。它们的关键特征是可以被"运行",即给定输入后能够产生输出。
runnable lambdas:Runnable Lambdas是一种特殊类型的Runnable,它们通常是简单的、匿名的函数。在LangChain中,你可以使用lambda函数来快速定义简单的操作,这些操作可以轻松地集成到更大的处理流程中。Runnable Lambdas提供了一种灵活且简洁的方式来定义自定义的数据处理步骤。
runnable sequences:Runnable Sequences是将多个Runnables组合在一起的方式。它允许你创建一个处理流水线,其中一个Runnable的输出可以作为下一个Runnable的输入。这种序列化的方法使得创建复杂的处理链变得简单,每个步骤都可以独立定义和测试,然后组合成一个完整的工作流程。
如下是一个事例,实际我们使用中,直接使用LCEL就可以了。如下的代码仅仅用于参考,理解背后的原理:
# Create individual runnables (steps in the chain)

# **x是Python中的解包操作符,用于字典。它的作用是将字典x中的所有键值对作为单独的关键字参数传递给函数。

format_prompt = RunnableLambda(lambda x: prompt_template.format_prompt(**x))

invoke_model = RunnableLambda(lambda x: model.invoke(x.to_messages()))

parse_output = RunnableLambda(lambda x: x.content)


# Create the RunnableSequence (equivalent to the LCEL chain)

chain = RunnableSequence(first=format_prompt, middle=[invoke_model], last=parse_output)
3.2 Chain的三种运行模式:
Extended:串连执行
Parallel:并行执行
Branching:判断执行
chain module/extended
我们可以自己利用lambda函数,写一些runnable lambda,随后可以按照LCEL加入到chain中进行串联运行。这个的好处在于,你可以把你任何想做的事情,嵌入到一个lambda函数中,例如,嵌入一个API call。
# Define prompt templates
prompt_template = ChatPromptTemplate.from_messages(
    [
        ("system", "You are a comedian who tells jokes about {topic}."),
        ("human", "Tell me {joke_count} jokes."),
    ]
)

# Define additional processing steps using RunnableLambda
uppercase_output = RunnableLambda(lambda x: x.upper())
count_words = RunnableLambda(lambda x: f"Word count: {len(x.split())}\n{x}")

# Create the combined chain using LangChain Expression Language (LCEL)
chain = prompt_template | model | StrOutputParser() | uppercase_output | count_words

# Run the chain
result = chain.invoke({"topic": "lawyers", "joke_count": 3})
chain module/parallel
Langchian提供了并行运行的功能,可以在LCEL进行调用。之所以需要并行,我的理解是,LLM本身就存在token生成的过程,相比传统的数据库查询,慢了不是一个数量级。因此,当多个任务进行串行时,等待的时间势必会进一步拉长,因此在这种场景下,parallel就是很刚需的了。
以下是一个调用方法的简单的示例:
# Simplify branches with LCEL
pros_branch_chain = (
    RunnableLambda(lambda x: analyze_pros(x)) | model | StrOutputParser()
)

cons_branch_chain = (
    RunnableLambda(lambda x: analyze_cons(x)) | model | StrOutputParser()
)

# Create the combined chain using LangChain Expression Language (LCEL)
chain = (
    prompt_template
    | model
    | StrOutputParser()
    | RunnableParallel(branches={"pros": pros_branch_chain, "cons": cons_branch_chain})
    | RunnableLambda(lambda x: combine_pros_cons(x["branches"]["pros"], x["branches"]["cons"]))
)
chain module/branching
这个就是Langchian的if语句,按照不同的结果,执行不同的branch。
最常见的案例就是,对于客户的评价进行分类,按照不同的分类使用不同的prompt进行处理。
案例:
# Define the feedback classification template
classification_template = ChatPromptTemplate.from_messages(
    [
        ("system", "You are a helpful assistant."),
        ("human","Classify the sentiment of this feedback as positive, negative, neutral, or escalate: {feedback}."),
    ]
)

# Define the runnable branches for handling feedback
branches = RunnableBranch(
    (
        lambda x: "positive" in x,
        positive_feedback_template | model | StrOutputParser()  # 正面反馈chain
    ),
    (
        lambda x: "negative" in x,
        negative_feedback_template | model | StrOutputParser()  # 负面反馈chain
    ),
    (
        lambda x: "neutral" in x,
        neutral_feedback_template | model | StrOutputParser()  # 普通反馈chain
    ),
    escalate_feedback_template | model | StrOutputParser()     # 搞不定的chain
)

# Create the classification chain
classification_chain = classification_template | model | StrOutputParser()

# Combine classification and response generation into one chain
chain = classification_chain | branches
四、RAG (Retrieval-Augmented Generation)
4.1 What's RAG
RAG(检索增强生成)技术目前使用范围非常广泛,一般的介绍强调RAG为LLM增加了获取数据的能力,实现了LLM与现实世界(如Web和API)的连接,并增强了LLM获取私有知识库的能力。我倒是觉得,RAG更像是一种高级的检索方式,实现了基于语义理解的搜索。
传统搜索引擎主要基于关键词匹配,而RAG利用LLM的语义理解能力,将检索从单纯的词语匹配提升到了语义层面的相似性搜索。这种转变使得检索结果更加精确和相关。并且有了多模态的加持之后,可以进一步实现图片、语音、视频的检索。
4.2 文字RAG的原理
当我们使用RAG时,本质其实是在原有问题的基础上,进一步的加上我们根据语义所检索回来的信息,最终拼凑出来一个完整的prompt给LLM。因此对于一个知识库而言,是必须提前做切分的,做成小块的chunks,再对于chunks做embedding,最终再存放至向量数据库。
不同的模型,最大的上下文窗口的大小差异较大,我们最常用的GPT-4,实际上只有8000左右的token数。实际的chunk切分过程中,可以切分成1000-2000 tokens的chunks,最终3个chunk加原始的问题,基本上就足够了。对于其他的模型而言,可以结合实际情况测试验证。
文本分块:将长文本切分成较小的chunk(通常约1000-2000tokens),以适应LLM的输入窗口限制(如ChatGPT约8000 tokens)。
文本嵌入:使用嵌入模型将文本转换为向量表示。语义相近的词汇在向量空间中距离较近,这使得基于相似性的搜索成为可能。
问题嵌入:用户的问题也会被转换为向量表示。
相似度检索:通过比较问题向量和文本chunk向量的相似度,找出最相关的内容。
向量存储:使用如Chroma等向量数据库存储和检索这些向量。
常见厂家模型的窗口大小:
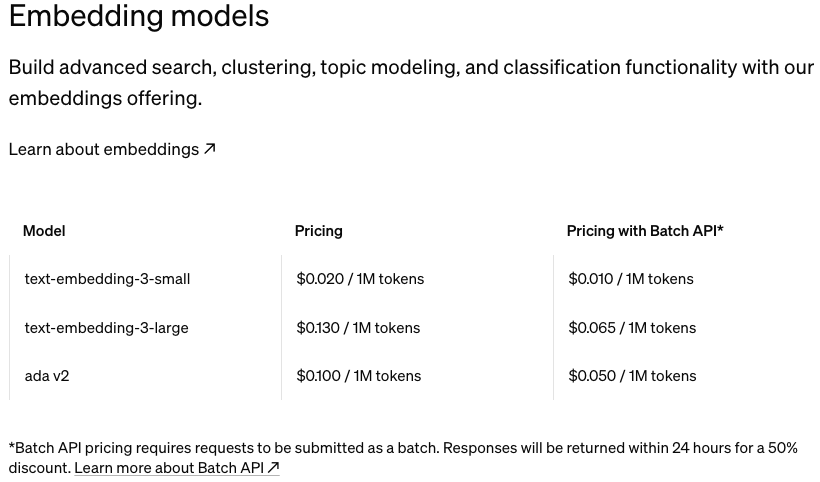
4.3 Embedding models
各个厂家都有自己的embedding models,并且是收费的。对于历史数据或者知识库的embedding,只需要做一次就可以了。原始的数据使用哪个模型进行embedding,在进行语义检索的时候,也必须同样使用哪个embedding model。他们是强相关,必须搭配使用的。
openai的embedding models的价格:https://openai.com/api/pricing/
由于Gemini API存在免费额度,本章节后续的embedding使用了Gemini。同时hugging face存在本地部署的embedding models,可以免费使用。
大家可以按需选用:https://huggingface.co/models?sort=downloads&search=embedding
4.4 Text Splitting methods
进行文字的切块,有几种方式:
基于字符的分割 (Character-based Splitting)
基于句子的分割 (Sentence-based Splitting)
基于Token的分割 (Token-based Splitting)
递归字符分割 (Recursive Character-based Splitting) ,若无特殊的情况,建议使用这种。
自定义分割 (Custom Splitting)
此处额外解释一下chunk_overlap:chunk_overlap有助于在分割文本时保持内容的连贯性,尤其是在自然语言处理任务中。通过引入重叠,可以确保相邻块之间的上下文关系不被完全切断,从而提高处理结果的质量。
例如: chunk_overlap 设置为 100,那么每个块与它前面的块将共享 /重叠100 个字符。比如:
第一块:字符 1 到 500
第二块:字符 401 到 900
第三块:字符 801 到 1300
依此类推
案例:
# 1. Character-based Splitting
# Splits text into chunks based on a specified number of characters.
# Useful for consistent chunk sizes regardless of content structure.
print("\n--- Using Character-based Splitting ---")
char_splitter = CharacterTextSplitter(chunk_size=1000, chunk_overlap=100)
char_docs = char_splitter.split_documents(documents)
create_vector_store(char_docs, "chroma_db_char")

# 2. Sentence-based Splitting
# Splits text into chunks based on sentences, ensuring chunks end at sentence boundaries.
# Ideal for maintaining semantic coherence within chunks.
print("\n--- Using Sentence-based Splitting ---")
sent_splitter = SentenceTransformersTokenTextSplitter(chunk_size=1000)
sent_docs = sent_splitter.split_documents(documents)
create_vector_store(sent_docs, "chroma_db_sent")

# 3. Token-based Splitting
# Splits text into chunks based on tokens (words or subwords), using tokenizers like GPT-2.
# Useful for transformer models with strict token limits.
print("\n--- Using Token-based Splitting ---")
token_splitter = TokenTextSplitter(chunk_overlap=0, chunk_size=512)
token_docs = token_splitter.split_documents(documents)
create_vector_store(token_docs, "chroma_db_token")

# 4. Recursive Character-based Splitting
# Attempts to split text at natural boundaries (sentences, paragraphs) within character limit.
# Balances between maintaining coherence and adhering to character limits.
print("\n--- Using Recursive Character-based Splitting ---")
rec_char_splitter = RecursiveCharacterTextSplitter(
    chunk_size=1000, chunk_overlap=100)
rec_char_docs = rec_char_splitter.split_documents(documents)
create_vector_store(rec_char_docs, "chroma_db_rec_char")

# 5. Custom Splitting
# Allows creating custom splitting logic based on specific requirements.
# Useful for documents with unique structure that standard splitters can't handle.
print("\n--- Using Custom Splitting ---")
4.5 Embedding & Add Metadata
完成chunk的切分之后,就可以将chunk进行embedding,插入向量数据库。在插入向量数据库的时候,可以指定metadata,如不指定则使用文件路径。
LangChain支持的向量数据库种类非常丰富:https://python.langchain.com/v0.2/docs/integrations/vectorstores/
本文中将采用Chroma:https://python.langchain.com/v0.2/docs/integrations/vectorstores/chroma/
案例:
import os
from langchain.text_splitter import CharacterTextSplitter
from langchain_community.document_loaders import TextLoader
from langchain_community.vectorstores import Chroma
from langchain_google_genai import GoogleGenerativeAIEmbeddings


# Define the directory containing the text files and the persistent directory
current_dir = os.path.dirname(os.path.abspath(__file__))
books_dir = os.path.join(current_dir, "books")
db_dir = os.path.join(current_dir, "db")
persistent_directory = os.path.join(db_dir, "chroma_db_with_metadata")


# Check if the Chroma vector store already exists
if not os.path.exists(persistent_directory):
    print("Persistent directory does not exist. Initializing vector store...")

    # Ensure the books directory exists
    if not os.path.exists(books_dir):
        raise FileNotFoundError(
            f"The directory {books_dir} does not exist. Please check the path."
        )

    # List all text files in the directory
    book_files = [f for f in os.listdir(books_dir) if f.endswith(".txt")]

    # Read the text content from each file and store it with metadata
    documents = []
    for book_file in book_files:
        file_path = os.path.join(books_dir, book_file)
        loader = TextLoader(file_path)
        book_docs = loader.load()
        for doc in book_docs:
            # Add metadata to each document indicating its source
            doc.metadata = {"source": book_file}
            documents.append(doc)

    # Split the documents into chunks
    text_splitter = CharacterTextSplitter(chunk_size=1000, chunk_overlap=0)
    docs = text_splitter.split_documents(documents)

    # Display information about the split documents
    print("\n--- Document Chunks Information ---")
    print(f"Number of document chunks: {len(docs)}")

    # Create embeddings
    print("\n--- Creating embeddings ---")
    embeddings = GoogleGenerativeAIEmbeddings(
        model="models/embedding-001")  # Update to a valid embedding model if needed
    print("\n--- Finished creating embeddings ---")

    # Create the vector store and persist it
    print("\n--- Creating and persisting vector store ---")
    db = Chroma.from_documents(
        docs, embeddings, persist_directory=persistent_directory)
    print("\n--- Finished creating and persisting vector store ---")

else:
    print("Vector store already exists. No need to initialize.")
4.6 Retriever search types
当完成数据的嵌入(embedding)处理后,我们就可以使用Retriever来进行数据的检索。Retriever提供了多种检索方式,包括:
相似度检索(Similarity):返回最接近的结果,这种方法适用于快速找到与查询最相似的内容。
最大边际相关性(MMR,Maximal Marginal Relevance):不仅考虑与查询的相似度,还兼顾结果之间的多样性,避免返回内容过于相似的结果。这种方法适合在保持相关性的同时,获得更多样化的答案。
相似度得分阈值(Similarity Score Threshold):设定一个相似度得分的最低阈值,只有超出这个阈值的结果才会被返回。
如下是案例:
# Function to query a vector store with different search types and parameters
def query_vector_store(
        store_name, query, embedding_function, search_type, search_kwargs
):
    if os.path.exists(persistent_directory):
        print(f"\n--- Querying the Vector Store {store_name} ---")
        db = Chroma(
            persist_directory=persistent_directory,
            embedding_function=embedding_function,
        )
        retriever = db.as_retriever(
            search_type=search_type,
            search_kwargs=search_kwargs,
        )
        relevant_docs = retriever.invoke(query)
        # Display the relevant results with metadata
        print(f"\n--- Relevant Documents for {store_name} ---")
        for i, doc in enumerate(relevant_docs, 1):
            print(f"Document {i}:\n{doc.page_content}\n")
            if doc.metadata:
                print(f"Source: {doc.metadata.get('source', 'Unknown')}\n")
    else:
        print(f"Vector store {store_name} does not exist.")


# 1. Similarity Search
print("\n--- Using Similarity Search ---")
query_vector_store("chroma_db_with_metadata", query,
                   embeddings, "similarity", {"k": 3})

# 2. Max Marginal Relevance (MMR)
# 'fetch_k' specifies the number of documents to initially fetch based on similarity.
# 'lambda_mult' controls the diversity of the results: 1 for minimum diversity, 0 for maximum.
print("\n--- Using Max Marginal Relevance (MMR) ---")
query_vector_store(
    "chroma_db_with_metadata",
    query,
    embeddings,
    "mmr",
    {"k": 3, "fetch_k": 20, "lambda_mult": 0.5},
)

# 3. Similarity Score Threshold
# 'score_threshold' sets the minimum similarity score a document must have to be considered relevant.
print("\n--- Using Similarity Score Threshold ---")
query_vector_store(
    "chroma_db_with_metadata",
    query,
    embeddings,
    "similarity_score_threshold",
    {"k": 3, "score_threshold": 0.1},
)
4.7 Web_scrape
在RAG的最后部分,探讨一下LLM与Web内容相结合的能力,也就是赋予LLM上网能力的实现。
LangChain 提供了一个名为 WebBaseLoader 的类,用于帮助用户直接抓取网页内容。其原理与传统的爬虫库相似,面对现代的前端框架如 Vue、React 等动态渲染页面时,WebBaseLoader 的表现一般,不过我觉得应该是会不断进步的。
目前市场上涌现了一些专为大语言模型设计的网页爬取产品,如 Firecrawl,不过是要钱的,效果会好很多,js渲染的一般都能加载出来,并且经过了清洗、格式化。https://www.firecrawl.dev/

此处案列为WebBaseLoader:
# WebBaseLoader loads web pages and extracts their content
urls = ["https://www.apple.com/"]

# Create a loader for web content
loader = WebBaseLoader(urls)
documents = loader.load()

# Step 2: Split the scraped content into chunks
# CharacterTextSplitter splits the text into smaller chunks
text_splitter = CharacterTextSplitter(chunk_size=1000, chunk_overlap=0)
docs = text_splitter.split_documents(documents)
五、Agents and Tools
熟悉并掌握了上边的这些能力之后,我们可以进一步的定义tools,并提供给agents进行调用。
5.1 什么是agent?
我所理解的agent实质上是一段精心构建的prompt,引导大型语言模型(LLM)按照预设的行为模式完成特定任务。通过Prompt及流程的构建,agent一般将具备如下的这些步骤或者能力:
Action(Use tools to search/execute/query/etc):使用工具进行搜索、执行、查询等操作
Observation:对行动结果进行观察和分析
Thought(Plan out actions next ):规划下一步行动
Final Answer:得出结论完成任务
下边我们以langsmith的一个最受欢迎的公共prompt,来理解agent行为的本质:
reason & action:https://smith.langchain.com/hub/hwchase17/react
reason & action原始
Answer the following questions as best you can. You have access to the following tools:

{tools}

Use the following format:

Question: the input question you must answer

Thought: you should always think about what to do

Action: the action to take, should be one of [{tool_names}]

Action Input: the input to the action

Observation: the result of the action

... (this Thought/Action/Action Input/Observation can repeat N times)

Thought: I now know the final answer

Final Answer: the final answer to the original input question

Begin!

Question: {input}

Thought:{agent_scratchpad}
reason & action注释
# 开场白:介绍AI的任务和可用工具
Answer the following questions as best you can. You have access to the following tools:

{tools}  # 这里会列出实际可用的工具

# 格式说明:定义了AI应该遵循的响应结构
Use the following format:

# 问题输入:用户提出的需要回答的问题
Question: the input question you must answer

# 思考过程:AI在每个步骤都应该进行的思考
Thought: you should always think about what to do

# 行动选择:AI选择要采取的行动,必须是预定义工具之一
Action: the action to take, should be one of [{tool_names}]  # tool_names会被实际的工具名称列表替换

# 行动输入:为选定的行动提供必要的输入信息
Action Input: the input to the action

# 观察结果:记录行动的结果或输出
Observation: the result of the action

# 循环提示:表明思考-行动-观察的过程可以重复多次
... (this Thought/Action/Action Input/Observation can repeat N times)

# 最终思考:AI表明已经准备好给出最终答案
Thought: I now know the final answer

# 最终答案:AI提供对原始问题的最终回答
Final Answer: the final answer to the original input question

# 开始指令:标志着AI应该开始执行任务
Begin!

# 实际问题输入:这里会被替换为用户实际输入的问题
Question: {input}

# 思考空间:为AI提供一个记录思考过程的区域
Thought:{agent_scratchpad}  # agent_scratchpad可能会被用来记录AI的思考过程或之前的尝试
通过结构化的对话格式,引导AI在思考、行动和观察之间循环,直到得出最终答案。系统允许AI使用预定义的工具,工具的输入输出在工具定义时可以指定(下边会提到),行动包括工具名称(action)和输入(action_input)。这种设计促使AI进行明确的思考过程,每一步都有清晰的记录,使得决策过程更加透明和可追踪。通过"Thought"(思考)、"Action"(行动)和"Observation"(观察)的循环,AI能够逐步推理并最终达成解决方案。
不同用途的agent,prompt存在差异,部分复杂的agent会对于过程的产出进行进一步的结构化,例如指定成JSON。
5.2 how to define a tool
工具的本质是function call,通过LangChain将其定义成可被agent调用的工具。其中,我觉得需要重点关注的部分还是函数的输入输出的指定,否则llm在调用的过程中很容易报错。
工具的定义应该是AI应用的核心了,工具的强大、可靠程度是AI agent效果的基石。可以仔细读下官方文档:
https://python.langchain.com/v0.1/docs/modules/tools/custom_tools/
首先展示三种简单工具定义方式:
不定义参数
Tool Constructor
Decorator
三个案例:
def greet_user(name: str) -> str:
    """Greets the user by name."""
    return f"Hello, {name}!"

def concatenate_strings(a: str, b: str) -> str:
    """Concatenates two strings."""
    return a + b

class ConcatenateStringsArgs(BaseModel):
    a: str = Field(description="First string")
    b: str = Field(description="Second string")

tools = [
    # Use Tool for simpler functions with a single input parameter.
    # This is straightforward and doesn't require an input schema.
    # 无参数指定
    Tool(
        name="GreetUser",  # Name of the tool
        func=greet_user,  # Function to execute
        description="Greets the user by name.",  # Description of the tool
    ),
    # Use StructuredTool for more complex functions that require multiple input parameters.
    # StructuredTool allows us to define an input schema using Pydantic, ensuring proper validation and description.
    # 使用args_schema进行参数的指定
    StructuredTool.from_function(
        func=concatenate_strings,  # Function to execute
        name="ConcatenateStrings",  # Name of the tool
        description="Concatenates two strings.",  # Description of the tool
        args_schema=ConcatenateStringsArgs,  # Schema defining the tool's input arguments
    ),
]


# 使用decorator的版本

@tool()
def greet_user(name: str) -> str:
    """Greets the user by name."""
    return f"Hello, {name}!"

class ConcatenateStringsArgs(BaseModel):
    a: str = Field(description="First string")
    b: str = Field(description="Second string")

@tool(args_schema=ConcatenateStringsArgs)
def concatenate_strings(a: str, b: str) -> str:
    """Concatenates two strings."""
    print("a", a)
    print("b", b)
    return a + b

tools = [
    greet_user,  # Simple tool without args_schema
    concatenate_strings,  # Tool with two parameters using args_schema
]
为了更加对于入参更加精准的掌控,LangChain还提供了基于subclass的tool定义方式:
class MultiplyNumbersArgs(BaseModel):
    x: float = Field(description="First number to multiply")
    y: float = Field(description="Second number to multiply")

class MultiplyNumbersTool(BaseTool):
    name = "multiply_numbers"
    description = "useful for multiplying two numbers"
    args_schema: Type[BaseModel] = MultiplyNumbersArgs

    def _run(
        self,
        x: float,
        y: float,
    ) -> str:
        """Use the tool."""
        result = x * y
        return f"The product of {x} and {y} is {result}"
5.3 Agent的使用
上述定义的工具都会表述清楚自己的功能,agent可以根据工具的用途,入参及出参选择合适的工具。
LangChain官方定了非常多不同类型的agent,从langchain.agents中的init来看,有如下那么多,估计随着后续更新还会更多、更丰富。
    "create_json_agent",
    "create_openapi_agent",
    "create_pbi_agent",
    "create_pbi_chat_agent",
    "create_spark_sql_agent",
    "create_sql_agent",
    "create_vectorstore_agent",
    "create_vectorstore_router_agent",
    "create_openai_functions_agent",
    "create_xml_agent",
    "create_react_agent",
    "create_openai_tools_agent",
    "create_self_ask_with_search_agent",
    "create_json_chat_agent",
    "create_structured_chat_agent",
    "create_tool_calling_agent",
每种agent类型适应不同的目标,搭配不同的prompt模板,最大化各自agent的特性和功能。常见的几个:
案例create_structured_chat_agent:
def get_current_time(*args, **kwargs):
    """Returns the current time in H:MM AM/PM format."""
    import datetime

    now = datetime.datetime.now()
    return now.strftime("%Y-%m-%d %H:%M:%S")

def search_wikipedia(query):
    """Searches Wikipedia and returns the summary of the first result."""
    from wikipedia import summary

    try:
        # Limit to two sentences for brevity
        return summary(query, sentences=2)
    except:
        return "I couldn't find any information on that."


# Define the tools that the agent can use
tools = [
    Tool(
        name="Time",
        func=get_current_time,
        description="Useful for when you need to know the current time.",
    ),
    Tool(
        name="Wikipedia",
        func=search_wikipedia,
        description="Useful for when you need to know information about a topic.",
    ),
]

# Load the correct JSON Chat Prompt from the hub
prompt = hub.pull("hwchase17/structured-chat-agent")

# Initialize a ChatOpenAI model
llm = ChatOpenAI(model="gpt-4o-mini")

# Create a structured Chat Agent with Conversation Buffer Memory
# ConversationBufferMemory stores the conversation history, allowing the agent to maintain context across interactions
memory = ConversationBufferMemory(
    memory_key="chat_history", return_messages=True)

# create_structured_chat_agent initializes a chat agent designed to interact using a structured prompt and tools
# It combines the language model (llm), tools, and prompt to create an interactive agent
agent = create_structured_chat_agent(llm=llm, tools=tools, prompt=prompt)

# AgentExecutor is responsible for managing the interaction between the user input, the agent, and the tools
# It also handles memory to ensure context is maintained throughout the conversation
agent_executor = AgentExecutor.from_agent_and_tools(
    agent=agent,
    tools=tools,
    verbose=True,
    memory=memory,  # Use the conversation memory to maintain context
    handle_parsing_errors=True,  # Handle any parsing errors gracefully
)

# Initial system message to set the context for the chat
# SystemMessage is used to define a message from the system to the agent, setting initial instructions or context
initial_message = "You are an AI assistant that can provide helpful answers using available tools.\nIf you are unable to answer, you can use the following tools: Time and Wikipedia."
memory.chat_memory.add_message(SystemMessage(content=initial_message))

# Chat Loop to interact with the user
while True:
    user_input = input("User: ")
    if user_input.lower() == "exit":
        break

    # Add the user's message to the conversation memory
    memory.chat_memory.add_message(HumanMessage(content=user_input))

    # Invoke the agent with the user input and the current chat history
    response = agent_executor.invoke({"input": user_input})
    print("Bot:", response["output"])

    # Add the agent's response to the conversation memory
    memory.chat_memory.add_message(AIMessage(content=response["output"]))
六、Token计算,RAG分词的计算依据
Token是NLP模型处理文本的基本单位。不同的模型可能会有不同的tokenization方法,但基本原理是将文本分解成更小的单位。
GPT系列为例的token计算:
英文示例:
输入:
"Hello, world!"Token计算:
["Hello", ",", " world", "!"]Token数量:4
中文示例:
输入:
"你好,世界!"Token计算:
["你", "好", ",", "世", "界", "!"]Token数量:6
混合语言示例:
输入:
"AI技术正在快速发展。The future is now!"Token计算:
["AI", "技", "术", "正", "在", "快", "速", "发", "展", "。", "The", " future", " is", " now", "!"]Token数量:15
特殊字符示例:
输入:
"E-mail: user@example.com"Token计算:
["E", "-", "mail", ":", " user", "@", "example", ".", "com"]Token数量:9
长单词示例:
输入:
"Supercalifragilisticexpialidocious"Token计算:
["Super", "cal", "ifrag", "ilistic", "exp", "ial", "idoc", "ious"]Token数量:8